Let me confess something embarrassing. Three years ago, I tried to make a traditional baked pumpkin pie for my in-laws’ Thanksgiving dinner. I was confident. I had the perfect crust recipe (well, I thought so). I had the spices measured down to the gram. I put it in the oven, went to hang some curtains, and completely lost track of time. When I walked back into the kitchen, the smell hit me first—not the cozy scent of cinnamon and nutmeg, but the sharp, acrid tang of burnt sugar and scorched dairy.
The pie was a disaster. The edges were black, the center was still jiggly, and the crust had shrunk away from the pan like it was trying to escape the situation. I stood there, staring at this sad, smoking mess, wondering how I’d managed to ruin the one dessert my family actually looked forward to. My mother-in-law was in the other room calling my name. Panic set in. I had zero time to bake another pie, and I certainly couldn’t serve a burnt one.
In a moment of pure desperation, I raided the fridge. I had leftover pumpkin puree, some heavy cream, and a box of gingersnap cookies I’d bought for a cookie exchange that never happened. I grabbed my food processor, dumped the cookies in, melted some butter, and pressed that crust into a springform pan. Then, I whipped up the filling. No eggs. No baking. Just chill time. I threw it in the freezer for two hours while I panicked about what to tell my guests.
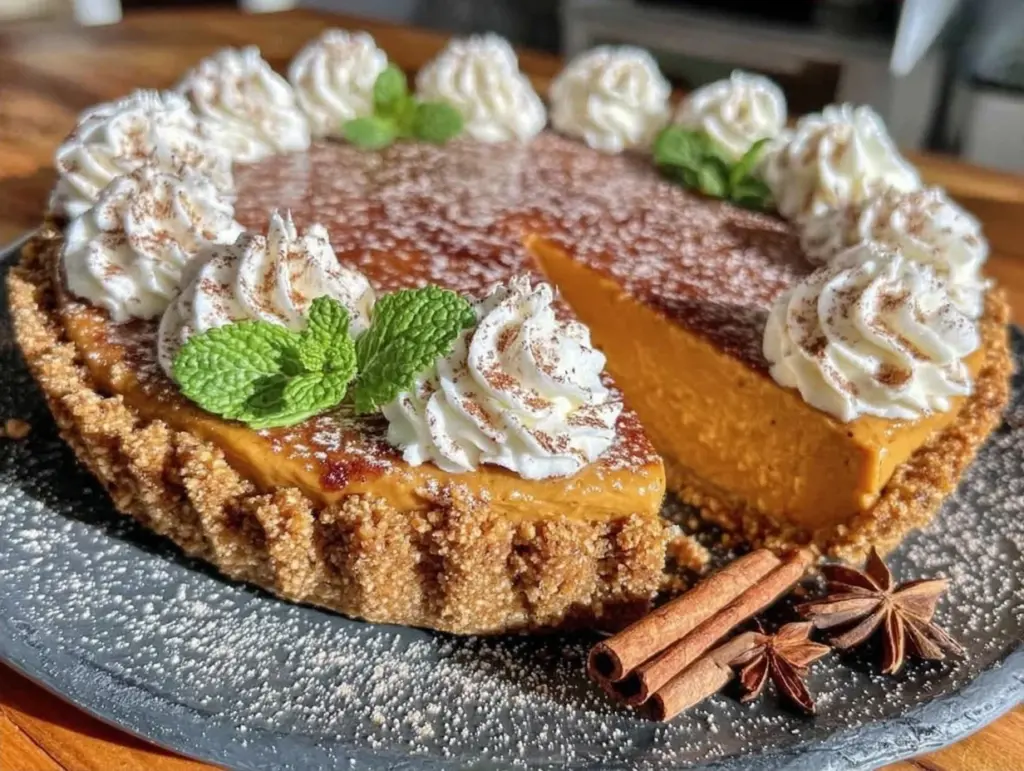
When I pulled it out, it was set. Firm. Beautiful. I dusted it with a little extra cinnamon, sliced it, and handed a piece to my skeptical father-in-law. He took one bite, chewed slowly, and said, “This is… actually incredible. Better than your usual, honey.” Turns out, my “disaster” backup plan was superior to the real thing. It was creamier, the spice flavor was more intense, and the gingersnap crust added a texture that baked pies just can’t match.
I’ve made this no-bake pumpkin pie with gingersnap crust every fall since. It’s my secret weapon for busy holidays, last-minute dinner parties, or just when I want a slice of pumpkin without turning my kitchen into a sauna. The secret trick? It’s all in how you handle the gingersnaps. If you crush them too fine, you get dust. If you leave them too chunky, you get a mouthful of rocks. There’s a sweet spot, and once you find it, you’ll never bake a pumpkin pie again.
Why You’ll Love This No-Bake Pumpkin Pie with Gingersnap Crust
Look, I love a good baked pie as much as the next person. But let’s be real: baking requires timing, temperature control, and patience. This no-bake pumpkin pie with gingersnap crust requires zero oven space and zero stress. Here’s why this recipe has earned a permanent spot in my fall rotation:
- Zero Oven Required — My apartment gets stifling in October. I don’t want to heat up my kitchen for a 45-minute bake. This pie stays cold. I make it on a hot day, and my kitchen stays cool. It’s a win-win.
- The Crust is the Star — Most pumpkin pies have a bland, buttery crust that disappears. The gingersnap crust here is spicy, crunchy, and adds a chewy texture that contrasts perfectly with the smooth filling. It’s the best part of every slice.
- Make-Ahead Friendly — I made this for Thanksgiving last year, and it sat in the fridge for 24 hours before serving. It actually got better. The flavors melded, the crust softened just a touch, and it held its shape perfectly. I can prep it days in advance.
- No Curdled Cream Risk — Baked custards can curdle if you overheat them. This filling relies on whipped cream and cream cheese for structure. It’s stable, forgiving, and impossible to break. If you’ve ever made a baked pumpkin pie that looked grainy, this is your fix.
- Gluten-Free Option — Not everyone in my family eats gluten. With one simple swap (gluten-free gingersnaps), this no-bake pumpkin pie with gingersnap crust becomes safe for everyone. It’s inclusive without sacrificing flavor.
This is my go-to when dinner needs to just work, but dessert needs to wow. It’s reliable, it’s delicious, and it’s incredibly easy.
Key Ingredients for the Best No-Bake Pumpkin Pie with Gingersnap Crust
Let’s talk about what goes into this pie. I’ve tested this recipe with different brands and substitutions, and here’s what actually matters. Don’t skimp on quality here; since there are only a few ingredients, they need to shine.
For the Crust
Gingersnap Cookies (14 oz / 400g) — Do not use ginger snaps that are hard as rocks. Look for soft-baked varieties like Nabisco or store-brand soft gingersnaps. They crush easier and have a better texture. If you can’t find them, use speculoos cookies for a more caramel-like flavor.
Unsalted Butter (6 tbsp / 85g) — Melted. I use salted butter if I’m in a hurry, but you must reduce the salt elsewhere. Unsalted gives you better control over the final taste. The butter binds the crumbs. If you’re dairy-free, use refined coconut oil, but it won’t have that rich mouthfeel.
Granulated Sugar (2 tbsp / 25g) — Optional. Gingersnaps are already sweet, but a little sugar helps them bind if your cookies are less sweet than mine. Taste your crumbs first. If they’re super sweet, skip this.
For the Filling
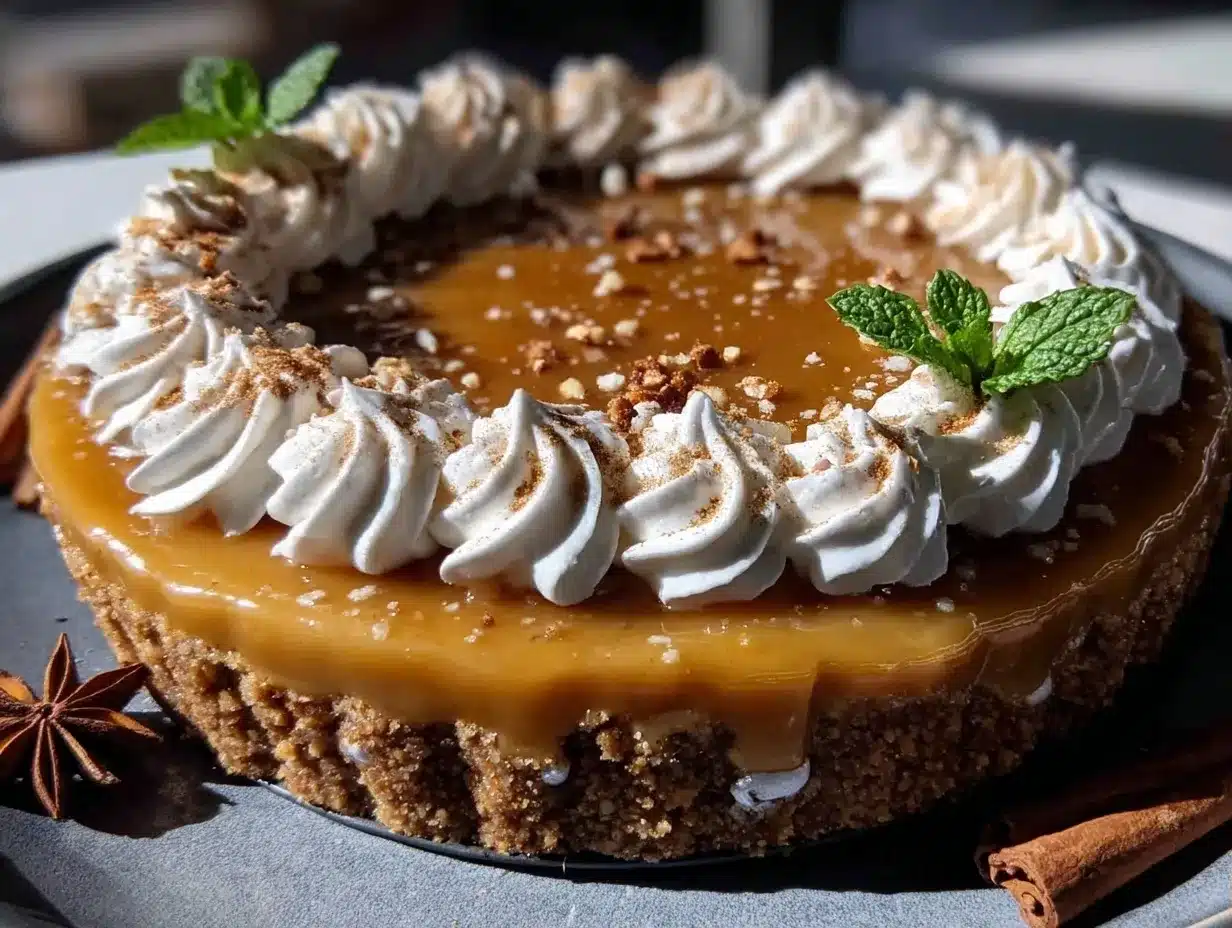
Full-Fat Cream Cheese (8 oz / 225g) — This is the backbone of the structure. It must be softened to room temperature. I learned this the hard way when I tried to mix cold cream cheese into whipped cream. It ended up in chunks. Let it sit on the counter for an hour before you start.
Heavy Whipping Cream (2 cups / 480ml) — Do not use light cream or half-and-half. You need the fat content to hold the whipped peaks. Cold cream whips better. Keep it in the fridge until the second you pour it into the bowl.
Pumpkin Puree (15 oz / 425g) — One standard can. Make sure it’s 100% pure pumpkin, not pumpkin pie filling. Pie filling has sugar and spices already added, which will throw off the balance. If you use pie filling, you must reduce the sugar in the recipe by half.
Pumpkin Pie Spice (2 tsp) — Check your spice cabinet. If your pumpkin spice is older than six months, toss it. It’s probably just dust by now. Fresh spice makes a massive difference. If you don’t have a blend, mix cinnamon, ginger, nutmeg, and cloves.
Tools Needed for This No-Bake Pumpkin Pie with Gingersnap Crust
You don’t need fancy equipment. Here’s what I use. I keep it simple because I want to make this pie, not wrestle with gadgets.
Food Processor — This is non-negotiable for the crust. It gives you even, sandy crumbs. A ziplock bag and rolling pin works in a pinch, but you’ll never get that uniform texture. I use my 14-cup Cuisinart.
9-Inch Springform Pan — The removable side is essential. This pie is dense and creamy; trying to slice it out of a regular pan will result in a mess. The springform pan lets it set evenly and release cleanly.
Electric Hand Mixer or Stand Mixer — Whipping two cups of cream by hand is an arm workout. I use a KitchenAid on medium speed. It takes about 3 minutes to get stiff peaks. If you’re using a hand mixer, be ready for some elbow grease.
Silicone Spatula — I use a large, flexible spatula to fold the whipped cream into the pumpkin mixture. It’s gentle and ensures you don’t deflate the air you just whipped into the cream.
Refrigerator Space — This seems obvious, but make sure you have room. The pie needs at least 4 hours, preferably overnight, to set. If your fridge is packed, move things around now.
How to Make This No-Bake Pumpkin Pie with Gingersnap Crust
Let’s walk through the process. I’m going to focus on the one moment that makes or breaks this pie: the folding technique. If you rush this, you’ll end up with a runny mess.
Step 1: Make the Crust (10 minutes)
Preheat your oven to 350°F (175°C). Place your gingersnap cookies in a food processor. Pulse until you have fine, sandy crumbs. This should take about 30-45 seconds. Scrape down the sides. Add the melted butter and sugar (if using). Pulse again until the mixture looks like wet sand. It should hold together when you pinch it.
Pour the mixture into your springform pan. Press it down firmly. Use the bottom of a measuring cup to pack it tight. You want an even layer. Go up the sides about an inch if you like a crust edge. Place the pan in the freezer while you make the filling. This helps it set quickly.
Step 2: Prepare the Filling Base (15 minutes)
In a large mixing bowl, beat the softened cream cheese until it is completely smooth. This is crucial. Any lumps will show up in the final pie. Add the pumpkin puree, pumpkin pie spice, vanilla extract, and salt. Mix on low speed until just combined. Scrape down the sides and the bottom of the bowl. Taste it. If it needs more spice, add a pinch. If it’s too thin, don’t worry; the whipped cream will fix it.
Step 3: Whip the Cream (5 minutes)
In a separate cold bowl, pour the heavy whipping cream. Add the powdered sugar and vanilla. Whip on medium-high speed until you form stiff peaks. The cream should hold its shape when you lift the beaters. Do not over-whip, or it will turn into butter. Stop as soon as it looks thick and holds peaks.
Step 4: The Critical Fold (5 minutes)
Here is the trick. Take one-third of the whipped cream and fold it into the pumpkin mixture. Use your spatula. Cut down through the center, scrape the bottom, and fold over the top. Do this gently. This lightens the dense pumpkin base. Once it’s uniform, add the remaining whipped cream. Fold gently again. You want to keep as much air in there as possible. The mixture should look marbled at first, then uniform. It should be fluffy, not dense.
Pour the filling into the chilled crust. Smooth the top with your spatula. Tap the pan gently on the counter to release air bubbles. Cover with plastic wrap and refrigerate for at least 4 hours, but overnight is best.
Total Time: 35 minutes active, plus 4+ hours chilling.
Expert Tips from My Kitchen
Here’s everything I learned from making this too many times. These tips separate the good pie from the great pie.
The Game-Changers
Don’t Over-Whip the Cream
This is the #1 mistake. Once the cream passes stiff peaks, it starts to separate. The first time I made this, I got distracted by a phone call and over-whipped. The texture was grainy and buttery. Never again. Watch it closely. Stop when it holds a peak that doesn’t droop.
Room Temperature Cream Cheese
If your cream cheese is cold, you’ll have lumps. I’ve tried to microwave it to speed things up, but it creates hot spots that melt the butter in the cheese. Just plan ahead. Let it sit on the counter for an hour. It’s worth the wait.
Chill the Bowl
For the whipped cream, put your mixing bowl in the freezer for 10 minutes before you start. Cold equipment helps the cream whip faster and hold more volume. It’s a small step that makes a big difference in texture.
Common Problems & Solutions
Problem: The crust is crumbling.
Solution: You didn’t use enough butter. The crumbs need to be damp enough to clump. Add another tablespoon of butter and press again.
Problem: The filling is runny.
Solution: Your cream wasn’t whipped stiff enough, or you over-folded it. Next time, whip the cream until it’s very stiff, and fold more gently. Also, make sure your pumpkin puree isn’t watery. If it is, strain it through a cheesecloth for 30 minutes first.
Problem: The pie is too spicy.
Solution: Pumpkin spice blends vary wildly. Start with 1 teaspoon of spice and add more to taste. You can always add more spice, but you can’t take it out.
Recipe Variations for Your No-Bake Pumpkin Pie with Gingersnap Crust
Once you’ve nailed the basic version, here’s how to mix it up. I love experimenting with flavors.
Maple Pecan Crunch
Add 1/2 cup of toasted pecans to the crust mixture. The nuttiness pairs beautifully with the gingersnaps. It adds a nice crunch and makes the pie feel more rustic.
White Chocolate Swirl
Melt 4 oz of white chocolate and swirl it into the filling before pouring it into the crust. It adds a sweet, creamy contrast to the spice. It looks beautiful and tastes like a dessert from a high-end bakery.
Coconut Pumpkin
Replace the heavy cream with coconut cream (the thick part from a can of full-fat coconut milk). It’s dairy-free and adds a tropical twist. Use coconut sugar in the crust. It’s surprisingly delicious.
Spiked Pumpkin
Add 2 tablespoons of bourbon or rum to the filling. The alcohol cuts through the richness and enhances the spice flavors. Let the alcohol evaporate slightly if you’re serving it to kids, or skip it entirely.
Serving & Storage for This No-Bake Pumpkin Pie with Gingersnap Crust
Serving
I serve this pie with a dollop of extra whipped cream and a sprinkle of cinnamon. It’s elegant but simple. Pair it with a cup of black coffee or a glass of sweet tea. If you’re hosting a crowd, slice it into wedges. It holds its shape well, so you won’t have messy slices.
Storage
Refrigerator: Store covered in the fridge for up to 5 days. It actually tastes better on day 2 or 3 as the flavors meld. Wrap it tightly with plastic wrap to prevent it from absorbing fridge odors.
Freezer: Yes, this freezes well! Wrap the entire pie (or individual slices) in plastic wrap and then foil. It will keep for up to 2 months. Thaw it in the fridge overnight before serving. The texture might be slightly softer, but it’s still delicious.
Meal Prep Tip: Make the crust and filling separately. Keep them in the fridge for 2 days. Assemble the pie the night before you need it. This gives you maximum flexibility.
Nutrition Information
I’m not a nutritionist, but here’s the breakdown per slice (1/8th of the pie).
| Nutrient | Amount |
|---|---|
| Calories | 380 kcal |
| Protein | 5g |
| Carbs | 42g |
| Fiber | 2g |
| Fat | 22g |
| Sodium | 250mg |
My Take: This is comfort food with cream cheese and heavy cream. It’s not diet food. But it’s better than takeout and I know what’s in it. The gingersnap crust adds some fiber, and the pumpkin provides vitamin A. Enjoy it as a special treat, not a daily snack.
Final Thoughts
This no-bake pumpkin pie with gingersnap crust has saved me more times than I can count. It’s reliable, it’s delicious, and it’s incredibly easy. I love that I can make it ahead of time and focus on my guests instead of my oven. If you make this, drop a comment! I love hearing how it turns out in your kitchen. Try the maple pecan variation if you’re feeling adventurous. Happy cooking!
Frequently Asked Questions
Can I use canned pumpkin pie filling instead of puree?
I strongly advise against it. Pie filling already contains sugar and spices, which will make your pie cloyingly sweet and overly spiced. If you must use it, reduce the sugar in the crust to zero and cut the pumpkin spice in the filling by half. But for the best results, stick to 100% pure pumpkin.
Why did my whipped cream deflate?
This usually happens if the bowl wasn’t cold enough or if you over-folded the mixture. Make sure your mixing bowl and beaters are chilled. When folding, use a gentle cutting motion and stop as soon as the mixture is uniform. Over-mixing breaks down the air bubbles.
Can I make this pie gluten-free?
Yes! Simply use gluten-free gingersnap cookies for the crust. Make sure they are soft-baked, as hard GF cookies don’t crush as easily. The filling is naturally gluten-free, so just double-check your pumpkin spice blend for any hidden gluten.
How long does this pie last in the fridge?
It stays fresh for up to 5 days. However, the crust may soften slightly after day 3. For the best texture, eat it within the first 3 days. It freezes well for up to 2 months if you need to save some for later.
Can I use a different type of cookie for the crust?
Absolutely. Graham crackers are a classic choice and work well. Speculoos cookies (like Biscoff) add a caramel-like flavor that’s delicious. Oreo cookies would make a chocolate-pumpkin pie, which is a fun twist. Just adjust the sugar in the crust based on how sweet your cookies are.
Pin This Recipe!
No-Bake Pumpkin Pie with Gingersnap Crust
- Total Time: 4 hours 35 minutes
- Yield: 8 servings 1x
Description
A creamy, no-bake pumpkin pie featuring a spicy gingersnap crust. This make-ahead dessert requires zero oven space and offers a foolproof alternative to traditional baked pumpkin pie.
Ingredients
- 14 oz (400g) soft-baked gingersnap cookies
- 6 tbsp (85g) unsalted butter, melted
- 2 tbsp granulated sugar (optional)
- 8 oz (225g) full-fat cream cheese, softened to room temperature
- 2 cups (480ml) heavy whipping cream, cold
- 15 oz (425g) 100% pure pumpkin puree
- 2 tsp pumpkin pie spice
- 1 tsp vanilla extract
- 1/4 tsp salt
- 2 tbsp powdered sugar (for cream)
- 1 tsp vanilla extract (for cream)
Instructions
- Preheat oven to 350°F (175°C). Pulse gingersnap cookies in a food processor until fine, sandy crumbs form.
- Add melted butter and optional granulated sugar to the crumbs. Pulse until the mixture resembles wet sand and holds together when pinched.
- Press the crust mixture firmly into the bottom and up the sides of a 9-inch springform pan. Place in the freezer while preparing the filling.
- In a large mixing bowl, beat the softened cream cheese until completely smooth.
- Add pumpkin puree, pumpkin pie spice, 1 tsp vanilla extract, and salt to the cream cheese. Mix on low speed until just combined.
- In a separate cold bowl, whip the heavy cream, powdered sugar, and 1 tsp vanilla on medium-high speed until stiff peaks form.
- Fold one-third of the whipped cream into the pumpkin mixture to lighten it.
- Gently fold in the remaining whipped cream until the mixture is uniform and fluffy.
- Pour the filling into the chilled crust and smooth the top.
- Tap the pan gently to release air bubbles, cover with plastic wrap, and refrigerate for at least 4 hours or overnight.
Notes
Ensure cream cheese is at room temperature to avoid lumps. Chill the mixing bowl for 10 minutes before whipping cream for better volume. Do not over-whip the cream or it will turn to butter. For a gluten-free version, use gluten-free gingersnap cookies. The pie can be stored in the fridge for up to 5 days or frozen for up to 2 months.
- Prep Time: 35 minutes
- Cook Time: 0 minutes
- Category: Dessert
- Cuisine: American
Nutrition
- Serving Size: 1 slice (1/8 of the
- Calories: 380
- Sugar: 28
- Sodium: 250
- Fat: 22
- Saturated Fat: 13
- Carbohydrates: 42
- Fiber: 2
- Protein: 5
Keywords: no-bake pumpkin pie, gingersnap crust, fall dessert, holiday dessert, make-ahead dessert, gluten-free option


